


ONBOARDING
A step-by-step guide to getting started with intheOffice software’s basics


THE DASHBOARD


YOUR DASHBOARD
A snapshot of the selected office’s overall capacity, those people in the office and working from home, the capacity of the office today and tomorrow, your current bookings and your ‘Statuses’ for the coming week.
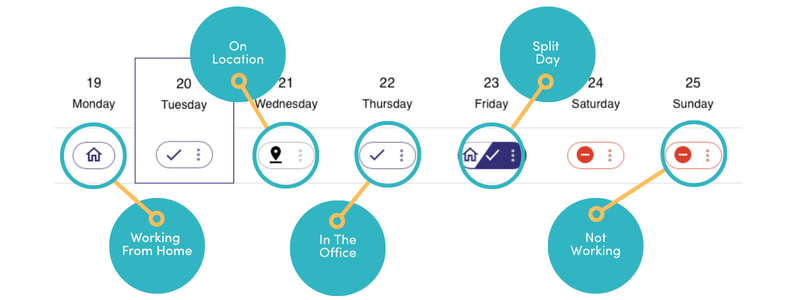
We have used icons to denote an individual’s whereabouts on a particular day. To change a Status, simply click on the icon repeatedly until the desired Status is shown.
The triple dots give you additional options to book hot-desks, Group/Area desks or Meeting Rooms and other Spaces your Admins have created in the software - anything from dog beds to car parking spaces.
DAILY STATUSES

SAVE TIME, SAVE A ROUTINE
If you have a regular routine for your working week, you can save this globally removing the need for daily updates. However, if your schedule changes, simply update that week’s Status from the Dashboard.

This brief video runs through the first page of intheOffice, the Dashboard. Here is a snapshot of the week ahead and the place to add your daily statuses and check out your office’s capacity.
SCHEDULING PAGE


CAPACITIES AND MORE
THE SCHEDULE PAGE
Whether by Group, Team or Location, get to the key information for where your people are on any given day from the Statuses they have used.
Filter using built-in dropdowns for Days, Week or Multiweek, plus Offices, Groups or Teams.
Admins and Managers can change their staff’s Statuses from here.
This short video is a brief demo of the Scheduling page where you see a visualisation of where people have reserved / booked for the day, week or multiple weeks ahead for the Office or Group you have selected.


Additional information on this page includes:
Status Icons
Daily Capacities as % and ITO numbers
Job Roles (Keyholder/Fire Marshall etc)
Links to Space Plan (Desk Booking), Scheduler (Office Spaces) and the Daily Report for the selected office
Hover over an ITO Status (tick) and the reservation pops up

BOOKING DESKS & SPACES
BOOKING A DESK / SPACE
There are two very simple ways to book hot Desks or Spaces from within your instance, from your personal Dashboard using the triple dots next to the Status icon. Or from the Schedule page and clicking on the date at the top of the screen.
On each occasion, the Space Plan tab/window will open and all of the Plan daily spaces or Scheduler for timed spaces.
This short screen video shows you both ways that you can book desks or Spaces.
The triple dots give you additional options to book Hot-desks, Group/Area desks or Meeting Rooms and other Spaces your Admins have created in the software.

MORE HELP?
Need help onboarding? No problem, book time with our experts
This link opens a Microsoft Bookings page where you can book a time and date to suit you.